Oracle Enterprise Manager Concepts Guide


CHAPTER 4. Job Scheduling
The Job Scheduling services allow you to automate standard and repetitive activities, such as executing a SQL script or running an operating system program. With the job system, you can create and manage jobs, schedule execution of jobs, and view information about the jobs. Jobs can be scheduled on a single node or multiple nodes in the network, provided that the node has an intelligent agent running on it. The topics discussed in this chapter include:
Job Scheduling Process
The Job scheduling process includes:
- Creating a job. This involves:
- Determining the type and destination of the job.
- Determining the tasks of the job.
- Determining the task parameters.
- Scheduling the times that the job executes.
- Saving and modifying a job, if desired.
- Submitting a job to the Job system.
- Viewing the job history to review the results of the job.
Job Tasks
The Job system provides a variety of pre-defined job tasks, or you can submit your own tasks by executing a SQL*Plus script or running an operating system program. Job tasks are implemented in the Tool Command Language (Tcl) scripts with Oracle extensions to include database specific commands. For more information, see the Oracle Enterprise Manager Application Developer's Guide.
The tasks are grouped by the destination of the task:
- Databases, which also include Node tasks
- Name Servers, which also include Node tasks
- Listeners, which also include Node tasks
The task scripts allow you to:
- Execute operating system programs or shell scripts.
- Execute SQL and DBA scripts.
- Perform database administration tasks including, starting up and shutting down Oracle databases.
- Start up and shut down SQL*Net Listeners.
- Distribute and install software.
Note: For information on the predefined job tasks and their parameters, see "Predefined Job Tasks" ![[*]](jump.gif) .
.
Note: For information on the predefined job tasks that distribute and install software, see "Managing Software Distribution" .
You can combine two or more pre-defined tasks into one job, called a composite job. Composite jobs can contain test conditions based on the success of a task. For example, if a composite job consists of two tasks, starting up a database and then running a SQL script, you can specify that the script be run only if the database was successfully started.
You can create jobs that can be used as "fixit" jobs for event conditions that are monitored with the Event Management System. Fixit jobs cannot be scheduled. See "Event Management" for information on monitoring events in the system.
Note: You need to set up a password file to perform administration tasks, such as start up or shut down, on a remote database. See "Administration of a Remote Database" .
Job Credentials
Jobs are normally run with the user preferences of the administrator who submitted the job. This means that jobs cannot be used to perform functions the administrator could not perform if logged into the machine directly.
Because jobs are categorized by the type of service they act on, the job system knows what credentials to pass to the agent. If the job runs on a node, the job system passes either the user preferences for the node or, if none are specified, your Console username and password. If the job runs on a service, such as a database, the job system also passes the user preferences for the service. For information on user preferences, see the "Console User Preferences" .
Submitting Jobs
The Job system is simple to use because the task of scheduling and managing jobs is centralized in the Enterprise Manager Console. The administrator only needs to submit a job once, regardless of the number of destinations on which the job will run or the number of times the job will be run.
When you submit a job, the Console's daemon process sends the job information to the appropriate intelligent agents on the destinations you selected. The agents are responsible for executing the job on schedule and returning job status messages back to the daemon.
Note: There is usually a slight delay between the submitting the job and the notification by the agent.
To schedule a job, you do not have to connect to the node on which the job will be run. You only need to submit the job to the Console and specify the destinations on which it should run. The destinations can include nodes, databases, listeners, names servers, and user-defined groups that have been created with the Map system.
Note: Jobs can only be run on nodes where an intelligent agent is running. If you send a job to a group, the job is only scheduled on the nodes in the group where the agent is running.
The job system of Enterprise Manager allows you to efficiently run jobs on multiple remote nodes by transferring job information to the agents servicing the nodes. When a job is executed, it is run by the agent on that node, thus minimizing network traffic between the remote node and the Console and daemon. In addition, jobs can be run on multiple nodes simultaneously because there is an intelligent agent residing on each node.
When you submit a job to one or more remote sites, it is possible that any one of those site may be down. If a site or its agent is down, the communication daemon queues any job requests that could not be delivered to the site. Once the site can be contacted, the daemon submits the queued job to the agent.
Job Window
You can view the different pages of job information by selecting the page tabs in the Job window. The pages in the Job window are:
You can switch between the pages by clicking on the tab of each page. The rows in both pages can be sorted on any column by clicking on the column heading.
The Job window can be hidden or shown by selecting Job in the Console View menu. You can also hide or show the window by clicking on the Job system icon in the Console toolbar.
See Figure 4 - 1 for an illustration of the Job Scheduling window.
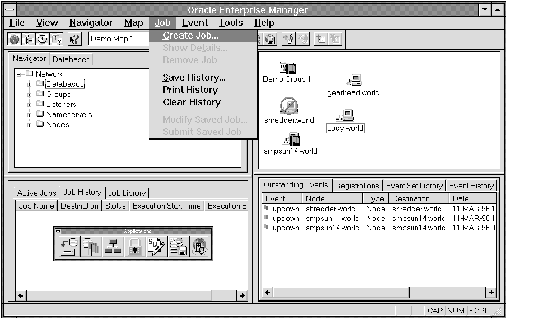 Figure 4 - 1. Job Window in the Console
Active Jobs
The Active Jobs page contains a summary of the active jobs on the network. These are jobs that you have submitted to the job system and are not yet completed. Each row is an execution of a particular job scheduled on a specific destination. While a job may execute multiple times, the job listed in the Active Jobs page is the one that is currently scheduled or running. You can use the Show Details menu option to display the details of the selected job. You cannot modify these jobs.
Note: You can double-click on a job listed in the Active Jobs page to view the job details.
- Job type is determined by an icon at the left of each row.
- A database icon signifies a database.
- A computer icon signifies a node.
- An ear icon signifies a listener.
- A NS icon signifies a names server.
- Job Name is the name of the job.
- Status of job is one of the following:
- Submitted: The job has been submitted to the agent at the job destination.
- Scheduled: The job has been successfully delivered to the agent and is scheduled for execution.
- Running: The job execution has started. After the job executes, the job execution is displayed in the Job History page. If this is the last scheduled execution of the job, the job is removed from the Active Jobs page. Otherwise, the job remains in the Active Jobs page and has the status of Scheduled.
- Pending Deletion: The job has been selected for deletion. When the deletion is successful, the job is removed from the Active Jobs page and added to the Job History page.
- Fixit: The fixit job has been submitted.
- Fixing: The fixit job is executing. A fixit job remains in the Active Jobs page until it is deleted.
- Next Execution Time of the job. A fixit job cannot be scheduled and displays Unknown for the next execution time.
Job History
Job History contains a list of previous job activities, such as multiple executions of a job. These are jobs that have been submitted to an agent and have executed successfully or unsuccessfully. This page also listed deleted jobs. You cannot modify these jobs.
- Job type is determined by an icon at the left of each row. These icons are the same as the Active Jobs page. See "Active Jobs" .
- Job Name is the name of the job.
- Destination of the the job.
- Status of job is one of the following:
- Completed: The job has executed successfully.
- Failed: The job execution has failed.
- Deleted: The job has been deleted.
For the other status categories, see "Active Jobs" .
- Execution Start Time is the time when the job started or was deleted. Because the order of agent notifications may vary, it is possible that the Console receives a completed or failed notification before a running notification. If this happens, the start time displays Unknown.
- Execution End Time is the time when the job finished, failed, or was deleted.
Note: You can double-click on a job listed in the Job History page to display the Job property sheet and view the Job Output dialog box, if output exists for the job. If no output is produced by a job, a message displays that states that there is no output for the job. If the output includes only blank spaces, the dialog box is blank.
Saving Job History
You can save the jobs from the Job History page to a text file and clear the jobs from the Job History window. This prevents the Job History page from being overloaded with obsolete jobs that occurred in previous days.
Job Library
Job Library contains a list of the jobs that you have created and saved. These jobs can be submitted to the job system at a later date. This is useful if you want to submit the same job at different times. You can use the Modify Saved Job menu option to modify a job selected in this page.
- Job Name is the name of the job.
- Job Description is the user supplied description of the job.
Note: You can double-click on a job listed in the Job Library page to modify the job.
Job Menu
The Job menu allows you to create, modify, save, submit, and manage jobs. The menu options are enabled depending the items selected in the Job window. See Figure 4 - 1 for an illustration of the Job menu.
Note: When you submit or delete a job, there is usually a slight delay while the agent processes the request.
Note: This action is recommended before clearing the Job History window.
| Print History | Prints the jobs listed in the Job History page. |
Note: This action is recommended before clearing the Job History window.
| Clear History | Clears the jobs listed in the Job History page. |
Note: The information is deleted from the repository.
Note: You can also double-click on a job listed in the Job Library page of the Job window to modify the saved job.
| Submit Saved Job | Submits the selected saved job to the Job system. |
Context-Sensitive Menus
If you select an item in the Job window with the right mouse button, the context-sensitive menu for that item appears. This menu is a subset of the Job menu.
Creating, Modifying, or Viewing a Job
When you create, modify, or view details of a job, similar property sheets display. The contents of the Create Job and Job Details property sheets are nearly identical. See Figure 4 - 2 for an illustration of a Job property sheet. The property sheets contains:
- Progress Page (Show Details only)
Attention: For this release of Oracle Enterprise Manager, you can only schedule jobs with a frequency of more than 24 hours. Do not use Hours and Minutes settings of the On Interval option. Also, the job task cannot run for more than 24 hours.
Attention: When submitting a job that consists of multiple tasks, the agent returns an error of "Maximum string length exceeded" if the the string of arguments that was sent is too long. In addition, the job fails. If that error displays when submitting a job, remove one or more tasks to shorten the string.
Creating a New Job
To create a new job:
1. Select Create Job from the Job menu to display the Create Job property sheet.
2. Complete the pages of the Create Job property sheet.
3. Determine whether the job is ready to submit.
- 3.1 Click on the Submit button to submit the job to the agents at the selected destinations. The job appears in the Active Jobs window.
- 3.2 Click on the Save button to save the job. The job appears in the Job Library window. You can modify or submit a saved job at a later time.
Note: There is usually a slight delay between the submitting the job and the notification by the agent.
Modifying a Saved Job
To modify a saved job:
Note: Only saved jobs that are in the Job Library page of the Job window can be modified. Submitted jobs in the Active Jobs window cannot be modified.
1. Select a saved job in the Job Library page of the Job window.
2. Select Modify Saved Job from the Job menu to display the Job Details property sheet.
3. Update the pages of the Job Details property sheet.
4. Determine whether the job is ready to submit.
- 4.1 Click on the Submit button to submit the job to the agents at the selected destinations. The job appears in the Active Jobs window.
- 4.2 Click on the Save button to save the job. The job appears in the Job Library window. You can modify or submit a saved job at a later time.
Viewing Job Details
To view the details of a job:
- Select a job in the Active Jobs page of the Job window.
- Select Show Details from the Job menu to display the Job Details property sheet.
- View the pages of the Job Details property sheet. This property sheet cannot be modified.
General Page
The General page allows you to determine job name, description, type, fixit job status, and destinations.
| Job Name | Enter the name of the new job. |
| Description | Enter the description of the job. |
| Fixit Job | Check this box if you want to use this job as fixit job for an event occurrence. The job cannot be scheduled. The job can be selected from the Fixit Job list in the Event Set Management Parameters page. See "Creating or Modifying an Event Set" . |
| Destination Type | Select the destination type from the pull-down list: Database, Listener, Node, or Names Server. |
Note: Listener job tasks are not available with this release.
| Job destinations | Select the destinations of the job in the Available Destinations list and click the << (Add) button to move the destination to the Selected Destinations list. |
| | The destinations are determined by the Job Type. The destinations include databases, listeners, nodes, names servers, and groups of these objects. |
- For an operating system task, a list of nodes and node groups displays.
- For a database task, a list of databases and database groups displays.
- For a listener task, a list of listener and listener groups displays.
- To remove a destination from a job, select the destination in the Selected Destination list and click the >> (Remove) button.
Note: Only network objects that have an agent running are included in the list of available destinations.
Example
This example illustrates how to complete the General Page when creating a job. Additional steps for completing the Tasks, Parameters, and Schedule Pages are discussed in following sections.
1. Select Create from the Job menu to create a new job. The Create Job property sheet displays.
2. Enter a name for the new job in the Job Name field of the General page. You may also enter a description for the job in the Description field.
3. Do not check the Fixit Job box for this job. You can create jobs that are used specifically as fixit jobs. Fixit jobs can be run automatically in response to an event occurrence. See "Event Management" for information on monitoring events in the system.
4. Select Database from the Destination Type pull-down list.
5. Select a destination from the Available Destinations list, then click on the << (Add) button to add the destination to the Selected Destinations list.
6. Repeat step 4 for another destination. You are choosing the destinations where the job will be run.
This example continues in the next section.
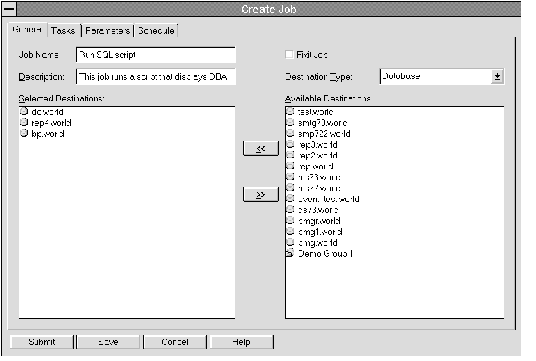 Figure 4 - 2. Job Property Sheet
Task Page
The Task page allows you to choose the tasks that you want the job to perform.
| Available Tasks | Select a task and click on the << (Add) button to include the task in the job. You can add multiple tasks to the job from the Available Tasks scrolling list. |
| | For information on job tasks and parameters, see "Predefined Job Tasks" . |
| Selected Tasks | You can remove tasks from this list. Select the task and click on the >> (Remove) button. |
- You can change the order in which the tasks are executed. Select a task in the Selected Tasks list and click on the up or down arrow button to position the task.
- You can make tasks conditional on previous tasks. Select a task and press the right arrow button to indent the task. A conditional, or indented, task is executed only if the previous task located further to the left successfully executes.
Note: If any task does not execute, control moves to the next task on the same level as the task that did not execute.
- You can also select a task and click the left arrow button to move the task to the left and eliminate conditional execution.
Example
This example illustrates how to complete the Tasks Page when creating a job. This example is a continuation of steps for completing the General Page. Additional steps for completing the Parameters and Schedule Pages are discussed in following sections.
7. Click on the Tasks page tab of the Create Job property sheet.
8. Select Startup Database from the Available Tasks list, then click the << (Add) button to add the task to the Selected Tasks list.
9. Select Run SQL*Plus from the Available Tasks list, then click the << (Add) button to add the task to the Selected Tasks list.
10. With Run SQL*Plus selected in the Selected Tasks list, click on right arrow at the top of the Selected Tasks list. This actions indents the Run SQL*Plus to the right and makes the task dependent on the next previous task that is located further to the left. In this example, the Run SQL*Plus task will only execute if the Startup Database executes successfully.
This example continues in the next section.
Parameters Page
On the Parameters Page, you specify parameter settings for the selected job tasks. To set the parameters for a task, select the task in the Selected Tasks list. The parameters for the selected task are displayed on the right side of the Parameters Page.
| Selected Tasks | Select the task that you want to set parameters for. |
| Task Parameters | Specify the parameters for the selected task. You can enter values in the entry boxes or select values from the pull-down lists. |
| | The parameters vary according to the job task. For information on the specific task parameters, see "Predefined Job Tasks" . |
| | For information on Software Manager and Data Manager job tasks, see "Managing Software Distribution" and "Managing and Moving Data" . |
| | For some jobs, you can override the preferred credentials for connecting to the service. This allows you to enter a username and password. For information on user preferences, see the "Console User Preferences" . |
Example
This example illustrates how to complete the Parameters Page when creating a job. This example is a continuation of steps for completing the General and Tasks Pages. Additional steps for completing the Schedule Page are discussed in following section.
11. Click on the Parameters page tab of the Create Job property sheet.
12. In the Parameters page, select Startup Database in the Selected Tasks list to set the following parameters:
- 12.1 Select Start instance, mount and open database from the Startup State pull-down list.
- 12.2 Enter the name of the initialization file that you want to use when starting the database. This the name of file on node where the database is located.
- 12.3 Check the Override Preferred Credentials box, then enter the appropriate username and password in the User Name and Password fields. If you do not override the credentials, the information that is set with the User Preferences property sheet is used. See "Console User Preferences" .
- 12.4 Select Normal from the Mount Mode pull-down list.
- 12.5 Select SYSDBA from the Connect As pull-down list.
- 12.6 Check the Force Startup box. Leave the Restrict connection privileges box unchecked.
13. In the Parameters page, select Run SQL*Plus in the Selected Tasks list to set the following parameters:
- 13.1 Click on the Browse button to locate the name of the existing SQL*Plus script file that you want to run. After you locate the file in the file selection box, click the OK button. The contents of the SQL*Plus script appears in the Script Text box.
- 13.2 In the Script Text box, edit the contents of the existing SQL*Plus script if necessary. Click on the Save button to save your updates.
- 13.3 Enter any command-line parameters that you want to run with the SQL*Plus script in the SQL Parameters field.
- 13.4 Check the Override Preferred Credentials box, then enter the appropriate username and password in the User Name and Password fields. If you do not override the credentials, the information that is set with the User Preferences property sheet is used.
Note: If you want to create a new script, enter SQL*Plus commands in the Script Text box before entering a SQL*Plus filename. When you are finished, Click the Save button and provide a name for the new SQL*Plus script file.
This example continues in the next section.
Schedule Page
The Schedule page allows you to schedule the execution of the job.
Attention: For this release of Oracle Enterprise Manager, you can only schedule jobs with a frequency of more than 24 hours. Do not use Hours and Minutes settings of the On Interval option. Also, the job task cannot run for more than 24 hours.
| Execute | Select the the frequency that you want the job executed. The choices are Immediately, Once, On Interval, On Day of Week, and On Date of Month. |
- Immediately schedules the job as soon as you click the Submit button. The job executes only one time.
- Once schedules the job only one time at the date and time you choose.
- On Interval allows you to schedule a specific time interval between job executions. The interval can be a combination of hours and minutes, or number of days. Select the value you want to change and click on the scroll buttons. You can also type in a new value.
- On Day of Week allows you to schedule the job on one or multiple days (Sunday, Monday, etc.) of the week. Click on the days of the week to select the days you want the job scheduled.
- On Date of Month allows you to schedule the job on one or multiple days (1 - 31) of the month. Click on the dates of the month to select the dates you want the job scheduled.
| Start Execution | Choose the first date and time that you want the job executed. This is the starting time for any job scheduled on an interval. |
- Select the month, day, or year in the Date field and click on the scroll buttons to change the value. You can also type in new values.
- Select the hour, minute, or AM/PM in the Time field and click on the scroll buttons to change the value. You can also type in new values.
| End Execution | Choose the last date and time that you want the job executed. This option does not apply if you chose the Immediately or Once execution options. |
- Select the month, day, or year in the Date field and click on the scroll buttons to change the value. You can also type in new values.
- Select the hour, minute, or AM/PM in the Time field and click on the scroll buttons to change the value. You can also type in new values.
| TIme Zone | Select the time zone from the pull-down list. The choices are Agent, Console, and GMT. |
- Agent: The agent schedules the job execution at each destination based on the actual system time of each agent. Jobs are not necessarily run simultaneously.
- Console: The agent schedules the job execution simultaneously on all destinations based on the system time of the Console.
- GMT: The agent schedules the job execution simultaneously on all destinations based on Greenwich Mean Time.
Example
This example illustrates how to complete the Schedule Page when creating a job. This example is a continuation of steps for completing the General, Tasks, and Parameters Pages.
14. Click on the Schedule page tab of the Create Job property sheet to schedule the execution of the job.
15. Select the On Interval Execute button to execute the job on a specific interval.
16. Set the Start Execution Date of the job to 3/31/96. Select the month value in the Start Execution Date field and enter 3. You can also click on the up and down arrows to change the value when a number is selected.
17. Repeat the process in the previous step for the day and year values of the Start Execution Date.
18. Change the Start Execution Time to 12:00 AM. Use the same procedure that you used to set the date.
19. Check the End Execution box to allow you to set a final execution date for this job.
20. Set the End Execution Date of the job to 6/30/96. Set the End Execution Time of the job to 12:00 AM.
21. Select Agent from the Time Zone pull-down list. This job will execute at the local time zone where the agent is located. This is the time zone of the destination.
22. Select the Every ... Days button to set the job frequency for day interval. Click on the up arrow to change the value to 3 days.
23. Click the Save button to save the new job in the Job Library window. You may want to modify this job later.
24. Select the job in the Job Library window and choose the Modify Saved Job menu option from the Job menu. You can also double-click on the job.
25. Click on the Submit button to submit the job to the agents at the selected destinations.
When the agent begins processing the job, the job appears in the Active Jobs page in the Job window. Starting on 3/31/96 at 12:00 AM, every three days the database will be restarted and a SQL*Plus script will be run.
Progress Page
The Progress page contains all notifications that have been received for a specific job. Each row in the page summarizes a status change of the job.
When you display the Progress page by double-clicking on a job execution, the page displays the notifications only for the destination and execution time of the job occurrence selected.
- If you select an execution from the History Page, the Progress page typically displays Submitted, Scheduled, Running, and Completed or Failed notifications for that execution.
- If you select an execution from the Active Jobs page, the Progress page displays those notifications that have already been received.
To view the notifications associated with other destinations or execution times, select other destinations or execution times from the pull-down lists. You can also select <All>" in either list to view all notifications. If the job has been Deleted on a destination, the Deleted notification always displays at the top of the Progress Page.
Note: The Progress page is only available with the Show Details option of the Job menu.
The columns contain the following information:
| Job Type | The job type is depicted with an icon at the left of the row. These icons are the same as the Active Jobs page. See "Active Jobs" . |
- A file icon signifies a database.
- A computer icon signifies a node.
- An ear icon signifies a listener.
- A NS icon signifies a names server.
| Status | For information on the status of a job, see "Active Jobs" and "Job History" . |
| Destination | This is the destination of the specific occurrence of the job. |
| Notification Time | This is the time the Console was notified. |
The following options are available on the page:
| Destination | Select the destination of the job occurrences you want to view from the pull-down list. Select <All> for all destinations. The list of job occurrences changes according to the selection. |
| Execution | Select the execution time of the job occurrences you want to view from the pull-down list. Select <All> for all executions. The list of job occurrences changes according to the selection. |
| Save As | Select the Save As button to save the list of job occurrences as a local file using the standard Windows file dialog box. |
| Print | Select the Print button to print the list of job occurrences in the Progress page. |
| Show Output | If output exists for an occurrence of a job, you can display the output in the Output dialog box. To display any existing output: |
- Select the job occurrence in the list and click on the Show Output button.
- You can also double-click on a selected job to display output.
Output Dialog Box
The Output dialog box displays any output as a result of the execution of an occurrence of a job.
Note: If no output is produced by a job, a message displays that states that there is no output for the job. If the output includes only blank spaces, the dialog box is blank.
With the Output dialog box displayed, the following options are available:
| Save As | Select the Save As button to save the output as a local file using the standard Windows file dialog box. |
| Close | Select the Close button to exit the dialog box after viewing it. |
| Print | Select the Print button to print the contents of the dialog box. |
| Job Definition | Select the Job Definition button to display more details. |
<Oracle Enterprise Manager Concepts GuideOracle Enterprise Manager Concepts Guide